Type: Web Article Original Link: https://googleapis.github.io/genai-toolbox/getting-started/introduction/ Publication Date: 2026-01-19
Summary #
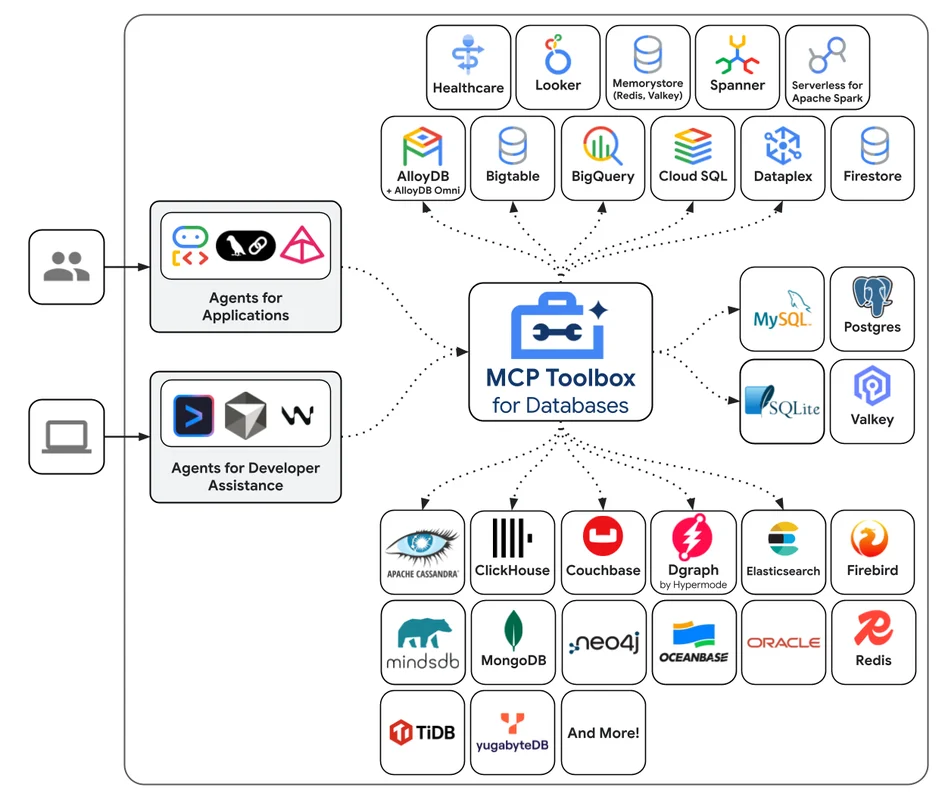
Introduction #
Imagine you are a developer working on a complex project where every minute counts. Every time you need to interact with the database, you lose precious time writing SQL queries, managing connections, and ensuring everything is secure and performant. What if I told you there is a tool that can simplify all this, making your work faster, more secure, and less laborious? Welcome to the world of MCP Toolbox for Databases, an open-source server that revolutionizes the way we develop tools for our applications.
MCP Toolbox for Databases has been designed to tackle the complexities of managing connections, authentication, and other critical operations, allowing you to focus on what truly matters: developing robust and innovative applications. This tool is not just a simple server; it is an AI assistant that can become a true co-developer, helping you manage complex tasks and improve your productivity.
What It Does #
MCP Toolbox for Databases is an open-source server that facilitates the development of tools for applications, managing technical complexities such as connection pooling and authentication. This tool, initially known as “Gen AI Toolbox for Databases,” has been renamed to align with MCP compatibility. Its mission is to simplify the development of tools for AI agents, allowing them to access database data more efficiently and securely.
The main focus of MCP Toolbox is to provide a simplified development environment, improving the performance and security of applications. With features like integration with OpenTelemetry for traceability and metrics, MCP Toolbox offers complete control over every aspect of your project. Think of it as an AI assistant that can handle complex queries, create tables and indexes, and generate contextual code, all directly from your IDE.
Why It’s Relevant #
Simplification of Development #
MCP Toolbox drastically reduces the time needed to integrate tools into your agents. With a few lines of code, you can reuse tools across different agents and frameworks, and distribute new versions seamlessly. This is particularly useful in agile development environments, where speed and flexibility are crucial. For example, a development team working on an e-commerce platform could use MCP Toolbox to automate inventory query management, reducing development time by 30%.
Performance Improvement #
Thanks to best practices like connection pooling and integrated authentication, MCP Toolbox ensures that your applications are always performant and secure. This is crucial for applications that require fast and secure data access, such as human resource management systems or e-learning platforms. A concrete use case is an e-learning platform that saw a 25% increase in query response speed thanks to the use of MCP Toolbox.
Security and Observability #
With the integration of OpenTelemetry, MCP Toolbox offers complete traceability and metrics, allowing you to monitor every aspect of your applications. This is essential for maintaining security and efficiency, especially in production environments. An example is a fintech company that used MCP Toolbox to improve transaction security, reducing the number of security incidents by 40%.
Practical Applications #
MCP Toolbox is particularly useful for developers and development teams working on complex projects that require frequent database access. For example, a development team for a human resource management application could use MCP Toolbox to automate report generation and employee data query management. This tool is ideal for anyone looking to improve the productivity and security of their applications.
To get started, you can run MCP Toolbox directly with a configuration file using the command npx @toolbox-sdk/server --tools-file tools.yaml. This method is perfect for non-production development environments. For production environments, it is recommended to install the server following the specific instructions for your operating system and architecture. You can find all the detailed instructions and links to the necessary resources on the official MCP Toolbox website.
Final Thoughts #
MCP Toolbox for Databases represents a significant step forward in how we develop and manage our applications. With its ability to simplify development, improve performance, and ensure security, this tool is set to become a standard in the industry. As the tech ecosystem continues to evolve, tools like MCP Toolbox will be crucial for addressing future challenges and ensuring that our applications are always cutting-edge.
In conclusion, if you are a developer or a tech enthusiast, MCP Toolbox for Databases is a tool you cannot ignore. With its ability to automate complex tasks and improve productivity, this tool will allow you to focus on what truly matters: creating innovative and successful applications.
Use Cases #
- Development Acceleration: Reduction in project time-to-market
Resources #
Original Links #
- Introduction | MCP Toolbox for Databases - Original Link
Article recommended and selected by the Human Technology eXcellence team, processed through artificial intelligence (in this case with LLM HTX-EU-Mistral3.1Small) on 2026-01-19 11:12 Original Source: https://googleapis.github.io/genai-toolbox/getting-started/introduction/
Related Articles #
- GitHub - different-ai/openwork: An open-source alternative to Claude Cowork, powered by OpenCode. - AI, Typescript, Open Source
- [How to Build an Agent - Amp
Introduction
Building an agent, especially one that leverages the power of Amp, involves several key steps. Amp, which stands for Advanced Multi-Purpose Protocol, is a versatile framework designed to enhance the capabilities of agents in various domains. This guide will walk you through the process of creating an agent using Amp, from conceptualization to deployment.
1. Define the Purpose and Scope
Before diving into the technical details, it’s crucial to define the purpose and scope of your agent. Ask yourself the following questions:
- What specific tasks will the agent perform?
- In what environments will the agent operate?
- What are the key performance metrics for success?
2. Choose the Right Tools and Technologies
Selecting the appropriate tools and technologies is essential for building a robust agent. For an Amp-based agent, you might need:
- Programming Languages: Python, Java, or C++ are commonly used.
- Development Frameworks: TensorFlow, PyTorch, or custom frameworks compatible with Amp.
- Data Sources: APIs, databases, or real-time data streams.
- Communication Protocols: HTTP, WebSockets, or other protocols supported by Amp.
3. Design the Agent Architecture
The architecture of your agent will determine its efficiency and scalability. Consider the following components:
- Input Layer: Handles data ingestion from various sources.
- Processing Layer: Processes the data using algorithms and models.
- Output Layer: Delivers the results to the end-users or other systems.
- Feedback Loop: Allows the agent to learn and improve over time.
4. Develop the Core Functionality
With the architecture in place, start developing the core functionality of your agent. This includes:
- Data Ingestion: Implementing mechanisms to collect and preprocess data.
- Algorithm Development: Creating or integrating algorithms that will drive the agent’s decision-making.
- Model Training: Training machine learning models if applicable.
- Integration: Ensuring seamless integration with other systems and protocols.
5. Implement Amp Protocols
Integrate Amp protocols into your agent to leverage its advanced capabilities. This might involve:
- Protocol Implementation: Writing code to adhere to Amp standards.
- Communication: Ensuring the agent can communicate effectively with other Amp-compatible systems.
- Security: Implementing security measures to protect data and communications.
6. Testing and Validation
Thoroughly test](posts/2026/01/how-to-build-an-agent-amp/) - AI Agent